
- Scanning and Document Management
- Features
- Comparison
- Overview
Rid Yourself of Unnecessary Paper and Maintain Immediate Access to Client\Customer Files from within Sage ACT!™
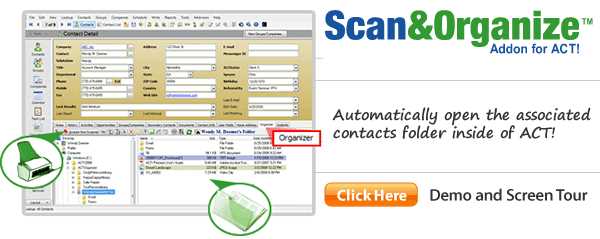
The Scan&Organize Addon for ACT! allows superior document management INSIDE of ACT! by creating a tab in your ACT! layouts called 'Organizer'. The Organizer tab allows you to link to the desired Windows folder for each contact, company and/or group and manage the files within the ACT! Interface.
Simply lookup the contact, company or group and click on the Organizer tab. The contents of the linked folder are automatically displayed.
From within the Organizer tab you can utilize the most common file management features available in Windows Explorer. We have also included a feature allowing you to scan documents directly into the linked folder. The scanned document can be saved as either a PDF, TIF. BMP, JPG or PNG file and can be easily shared with clients, associates or others. Networked ACT! users can also benefit by maintaining full access to the same shared folders.
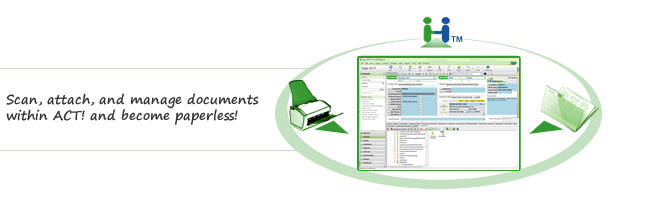
With Scan and Organize for ACT!, you can Scan, Attach, and Manage Documents from within the ACT! interface!
- Scan and attach the document directly to the contact’s folder on your computer or network.
- Automatically Open the associated contact’s folder inside of ACT! simply by looking up the contact!
- Create and Name Folders Automatically using data that exists in up to 3 ACT! fields OR assign the contact to a specific folder that is already on your computer or network!
- Perform file management functions from within ACT! such as copy, paste, rename, delete, etc.
- Scan and attach documents as PDF, TIFF, JPG, BMP, PNG and even optional OCR Text.
- Automatically assign keywords to documents during scan.
- Burn folders to CDR/RW (Windows XP only).
- Save document keywords to a specific field in ACT! for easy searching.
- ACT! users that synchronize can now have access to documents on their VPN or any logic drive letter path.
- Optional OCR function allows automatic keyword population.
- Drag and Drop support from Windows Explorer, Paperport, etc.
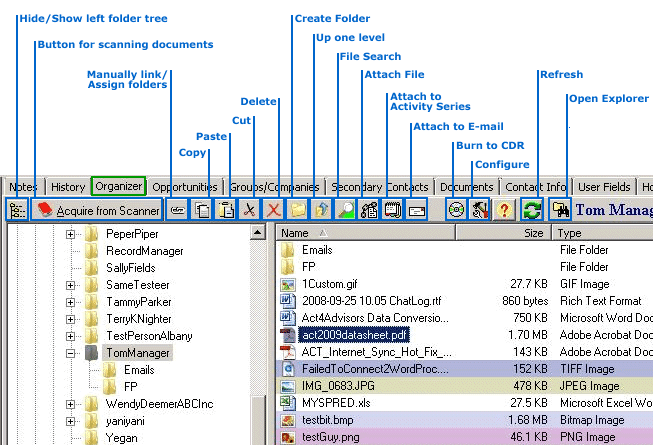
- Button to Hide or Show Left Folder Tree.
- Button to Open the Current Contact’s Folder in a separate, native Windows Explorer window.
- Attach scanned files to the Notes OR History OR Documents tab.
- Enhanced double click on Contact folder to lookup Contact.
- Launch Associated “viewer” for file type scanned.
- Adjustment for Organizer tab location.
- You already know how to use it!
Vertical Markets that can benefit from Scan&Organize:
| Financial Planners and Investment Advisors | Insurance Professionals |
| CPA and Accounting | Mortgage Brokers |
| Real Estate | Broker Dealers |
| Appraisers | Building Contractors |
| Credit and Collection Agencies | Manufacturers Reps |
| Recruiters | Architects |
Or any document intensive business or individual that uses ACT!
Compare Scan and Organize Addon for ACT! vs. ACT!'s Native Document Management Feature
| ACT!'s Document Management Features | Scan and Organize for ACT! | |
| Attached Document to Notes, History or Documents tabs | ||
| Attach file to an Activity | ||
| Attach a file shortcut to Notes, History or Documents tabs | v2008+ | |
| Email files from inside of ACT! | v2008+ | |
| Drag and Drop Files INTO ACT! | v2008+ | |
| Drag and Drop Files FROM ACT! | ||
| Drag and Drop Emails | ||
| Thumbnail View of Documents | ||
| Detail View of Documents | ||
| Attach file to an Activity Series | ||
| Scan Documents and Attach to Note, History, Documents tabs | ||
| Scan Documents and Attach to an Activity | ||
| Scan Documents and Attach to an Activty Series | ||
| Organize Files via Folders | ||
| Automatically Create Contact Folders and Subfolders | ||
| Go to a Contact by double clicking on the respective folder | ||
| Burn Files to CD or DVD | ||
| File Management Functions | ||
| Cut File(s) | ||
| Copy File(s) | ||
| Paste File(s) | ||
| Rename | ||
| Delete | ||
| Right Mouse Click Menu on File | ||
| File Search | ||
| Open Native Windows Explorer Folder |
ACT! has the functionality to "attach" a document as a shortcut to the Notes tab. This feature is helpful in many cases but the Notes tab can get overly populated with attachments. Since these attachments are simply shortcuts to the file on your computer, you may lose their link to the file if the file of folder is moved or renamed.
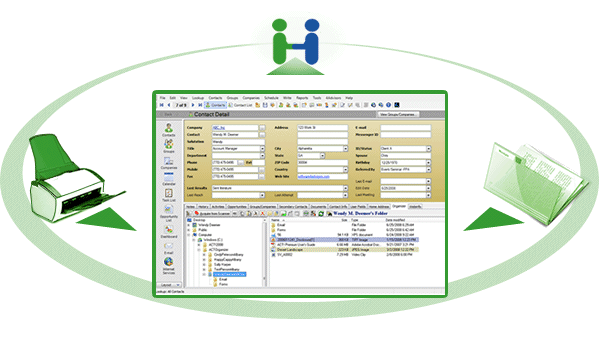
The Organizer tab will allow you to automatically navigate to their contact's folder and manage the files within the ACT! Interface. Simply lookup the contact and click on the Organizer tab. The client's folder will then be displayed.
From this folder window you can utilize most of the functionality that is normally available in the Windows Explorer. We have also included an optional feature that allows you to scan documents directly into this folder. The scanned document can be saved as either a BMP, JPG, PNG, TIF or PDF file and can be shared easily with the client, associates of others.
Configuration and Preferences
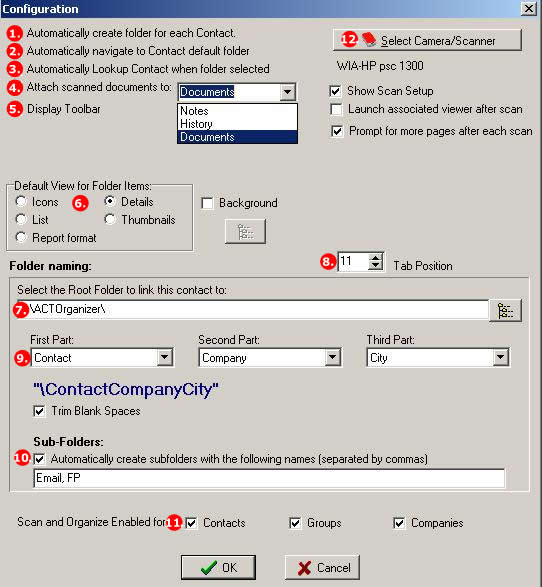
Before you begin using the Organizer, you should establish your Configuration Preferences. These preferences are stored with the database and will allow all networks users to share these settings.
- Choose this option to automatically create a folder for acitive contact if a folder does not already exist. Folder will be named using #9 in the example below.
- If the contact record is linked to a folder. The folder will open automatically in ACT upon Lookup.
- Choose this option to create a lookup by double clicking on the folder list pane.
- Scanned documents are copied to the client folder and attached to either Notes, History, or the Documents tab.
- You may display or hide toobar in the Organizer.
- Choose the default view for folder items.
- This designates the ROOT folder where all client folders will be created as default.
- This will allow you to move the Organizer tab to the desired position.
- Scan and Organize will use the designated fields for naming a folder but you can change it manually.
- Turn this function on to automatically create subfolders.
- You may enable Scan&Organize function for Contacts, Groups, or Companies.
- This will allow to select all available twain compatible scanners detected on your computer.
You should begin by creating or assigning a folder on your computer or network as the main client "root" folder. On a network, this folder should be the shared Documents folder as noted in you ACT! |Edit | Preferences | General tab. It should have a common mapped drive letter, i.e. T: drive. All users on the network should have access to this same drive letter. For single users, simply choose your defaulted Documents folder for ACT!. This is normally located under your My Documents\ACT\Document.
Once you have assigned the Root folder (see fig 7), choose the naming convention you would like for ACT! to name the folder (see fig 9). You might want to name all client folders using the data entered into the contact's Last Name, First name and Zip, i.e. SmithJohn30004. This feature ins only required if you have checked, "Automatically Create Folder for Each Contact". Otherwise, you will have the opportunity to enter or select any folder name you would like.
We also recommend that you check "Automatically Navigate to Contact Default Folder". This feature will allow you to immediately view the contact's files and folder as you lookup the respective contact in ACT!.
Scan and Organize Toolbar
The Scan and Organizer has a toolbar allowing the user to manage documents from within the ACT! Interface. The toolbar has common items found in Windows Explorer such as delete, copy, paste, etc.
Naming or Selecting a Folder
If you have already created a folder structure for your clients, you can use the "link button" to select an existing folder. By linking a contact to a folder, the defaulted folder path for the contact is written into the OrgPath field located on the Advisory tab. The same button can be used to name or rename the folder for the contact. You will note that a browse button on the right side of the "link" dialog box allows browsing to the desired folder. This will update the database when reselecting a folder.
Scanning
The button marked "Acquired from Camera/Scanner" allows the user to scan documents directly into the active folder. File formants available include TIF and PDF among others.
Keep in mind, the Scan and Organizer simply activates you existing Twain driver that comes with your scanner. After your Twain scanning software performs the scan, the Organizer redirects the file into the appropriate folder and appends the file with and additional data.
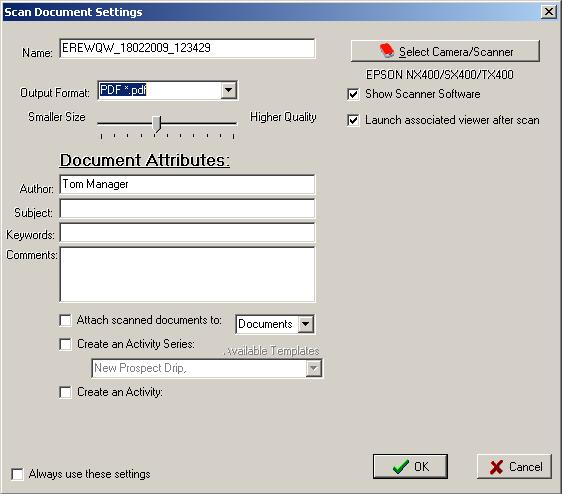
As a file in scanned, the user has the option to rename the file and has other options for:
- Designating the preferred file format including PDF, TIF, BMP, PNG and JPG
- Designating a multi page scan
- Manipulating image quality and file size
- Creating file properties that are sorted with the file. These properties include Author (defaults to the logon user's name), Subject and even Keywords. All of this information can later be searched using the Windows file Search function.
- Attach scanned images to the Documents, History, or Notes tab.
- Attach documents to an Activity or Activity Series.
Scan&Organize Addon for ACT! verson 5.0
Scan, attach, and manage documents within ACT! and become paperless.
Requires ACT! 6.0 or ACT! by Sage 2006 - 2011
Note: Online orders are available for US residents only. Canada and International sales please call 1.770.475.0495 x1 or email sales@software4advisors.com for purchasing assistance Monday - Friday 9AM - 6PM EDT.